Impact Analysis
Biosecurity impact analysis involves examining the environmental, social, and economic consequences of an invasive species incursion, to assess the associated risks, and thus inform biosecurity management decisions. Impact analysis is an essential component of broader biosecurity management approaches which involve: pre-border preventative measures; at-border surveillance and interception; post-border early detection surveillance and rapid responses; eradication, containment and control efforts to suppress or minimise the spread of established invasive species; and restoration, mitigation, or adaptation responses to resultant negative impacts.
Invasive species incursions may result in direct impacts such as damages, losses, additional costs, and other consequences for agriculture, fisheries, forestry and other production sectors, human communities, or natural environments. Alternatively, impacts may be indirect, including subsequent flow-on economic costs, losses, or price changes, as well as consequences for human health, well-being, and the environment.
Impacts from invasive species may be economic (monetary) in nature such as production losses, damages to assets, reduced property value, loss in employment, reduced product quantities, changing prices, and flow-on effects to other sectors like transport, retail, and tourism sectors. Domestic and international trade of commodities, such as agricultural products, may be disrupted by an invasive species incursion, due to regulations for pest and disease freedom.
Other impacts may be non-monetary, such as ecological and environmental damage, potential losses of biodiversity and ecosystem function, as well as impacts on human health and well-being. Many direct non-monetary impacts have indirect economic impacts such as: reduced land productivity and water availability; degraded municipality, recreation, and property values; and increased healthcare costs.
For more details about the Impact Analysis workflow please see the Impact Analysis support article.
Linkages to other workflows
Outputs of Impact Analysis can be used directly as inputs in other workflows, such as:
- Informing Surveillance Design workflows for determining where surveillance effort will have the greatest benefit by detecting incursions early in locations where they have the highest impacts
- Informing Resource Allocation workflows for determining where management effort will have the greatest benefit by managing incursions in locations where they have the highest impacts
Creating an Impact Analysis
Step 1. Create a new project
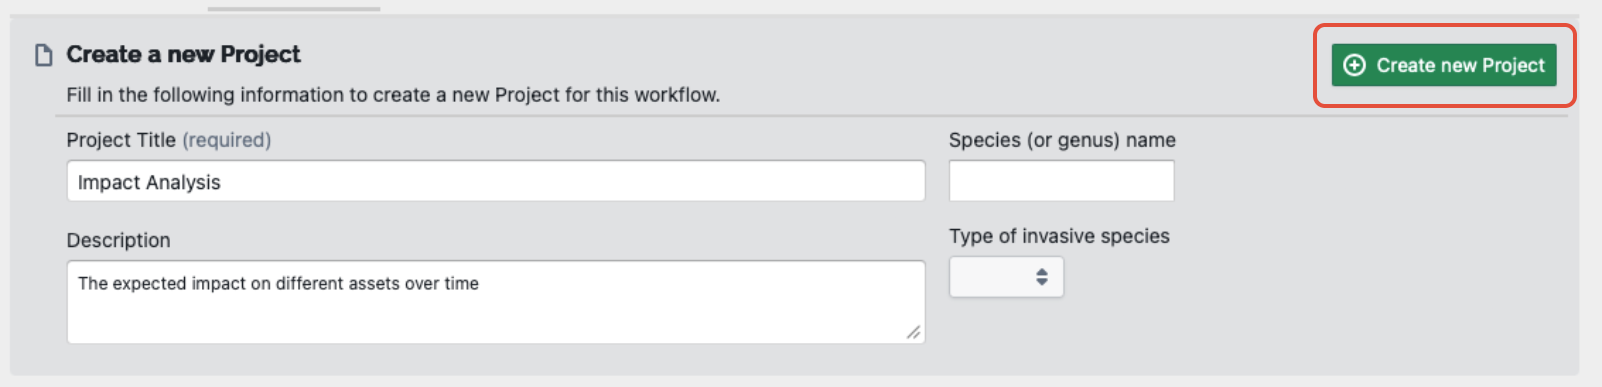
Select the Impact Analysis workflow and then select “Create new Project” (see screenshot below).
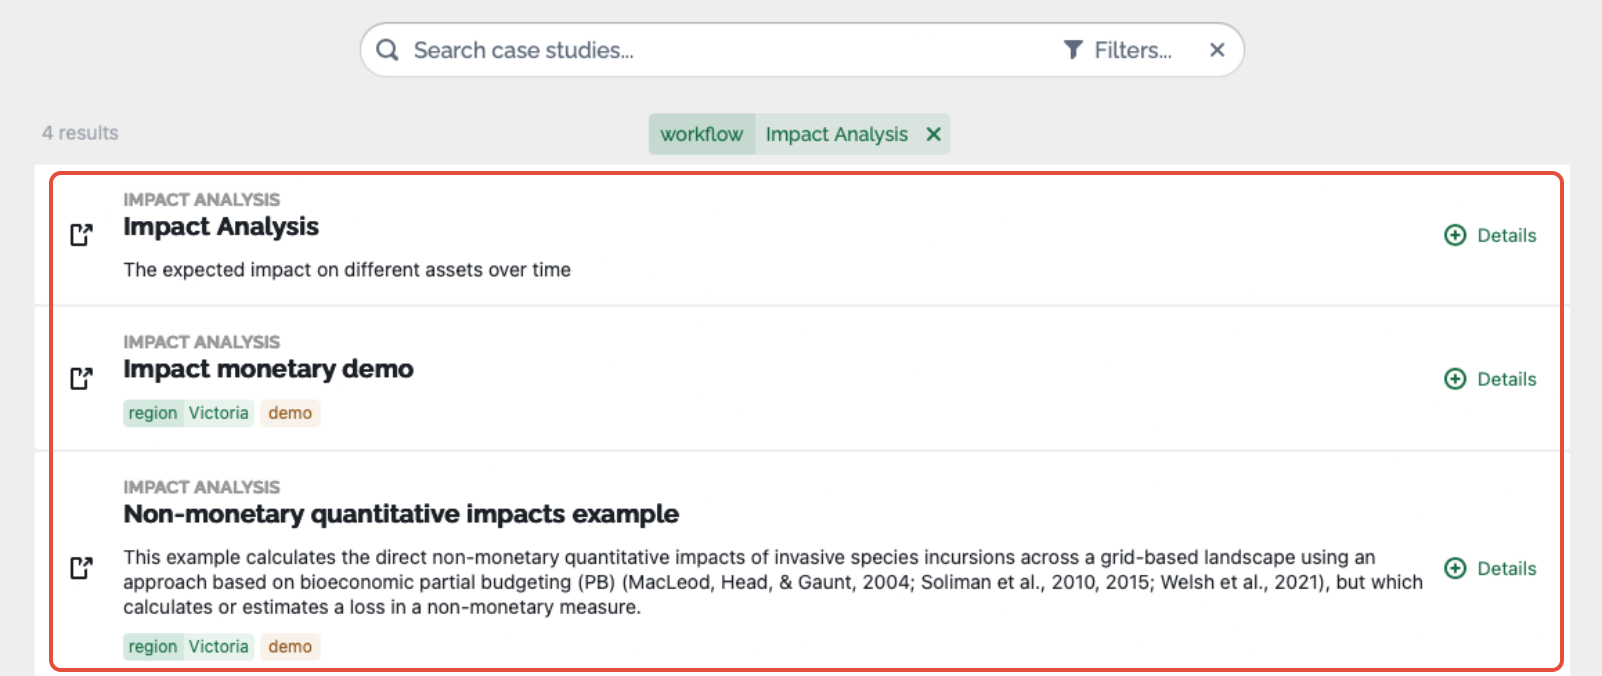
When creating a new Impact Analysis project, users can start an empty project, initially titled “Impact Analysis”, or one of a range of pre-populated case studies that have been constructed as examples of the workflow or based on previous case studies, e.g. “Medfly (imports)”.
The empty project is ideal for those wishing to create a brand-new Impact Analysis as it contains:
- The basic structure of the Impact Analysis workflow
- No preloaded datasets
By contrast, case studies provide users with the opportunity to see a completed demonstration of how Impact Analysis can be produced, or if based on a real-world case study, how others have attempted to create a model.
Select a case study and then give your project an appropriate title. Users can optionally provide additional descriptive details under the Description, Species name and Species type fields. These metadata are presently unused but will provide future flexibility in filtering and summarising projects.
Once details have been provided, click the green “Create new Project” button in the bottom right-hand corner to continue.
When you start an Impact Analysis workflow from an empty template you will be presented with the core elements of the Impact Analysis workflow on the left side of the screen – “Region”, “Occurrence”, “Valuation type” and “Impact Analysis”. Orange exclamation points indicate steps that require attention and, as you progress through the project, these change to green ticks when complete.
Step 2. Specify your region
Select a spatial study region or raster template to define the area of interest for your impact analysis by clicking the “Add New Input” button, and select an option:
- Crop to Region: For selecting a sub region within Australia
- Select a raster input from available (saved) results (“Choose from My Results”), previously uploaded datasets (“Explore My Datasets”), curated datasets (“Explore Curated Datasets”) or upload a new raster file (“Import/upload data”) defining the study region extent, resolution, and coordinate reference system
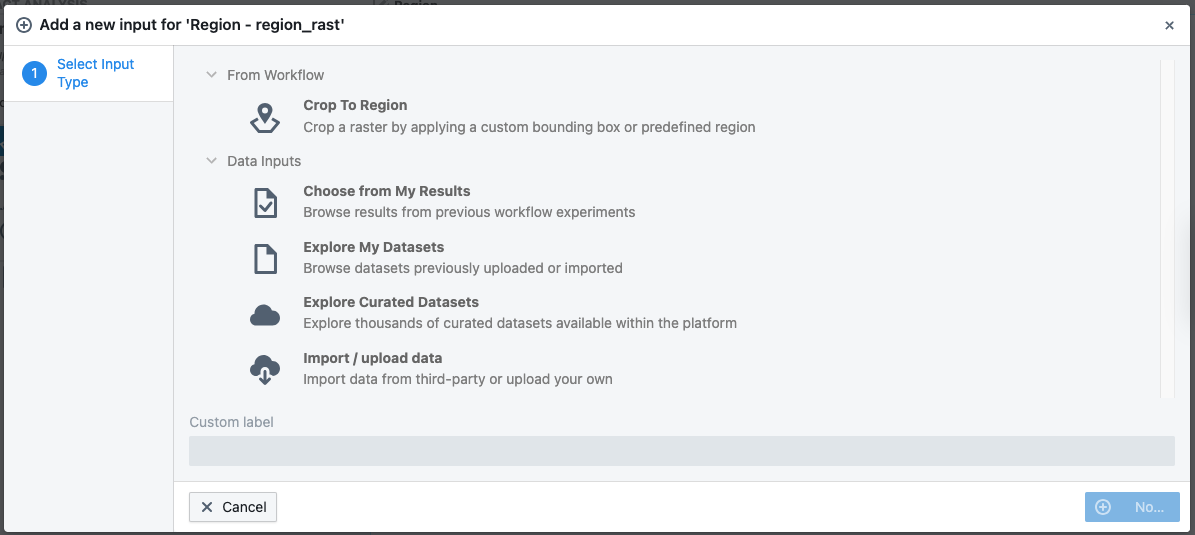
Depending on the study region input the user selects, different options will become available.
1. Crop to Region
The first region selection option is to create a custom region by selecting a pre-defined Australian (sub) region with an additional buffer:
- Local Government Areas
- National Resource Management Regions (NRMs)
- Australian state and territories
- IBRA regions
- River regions
- Drainage Divisions (Level 1 or 2)
- Marine Ecoregions of the world
- IMCRA provincial or meso-scale bioregions
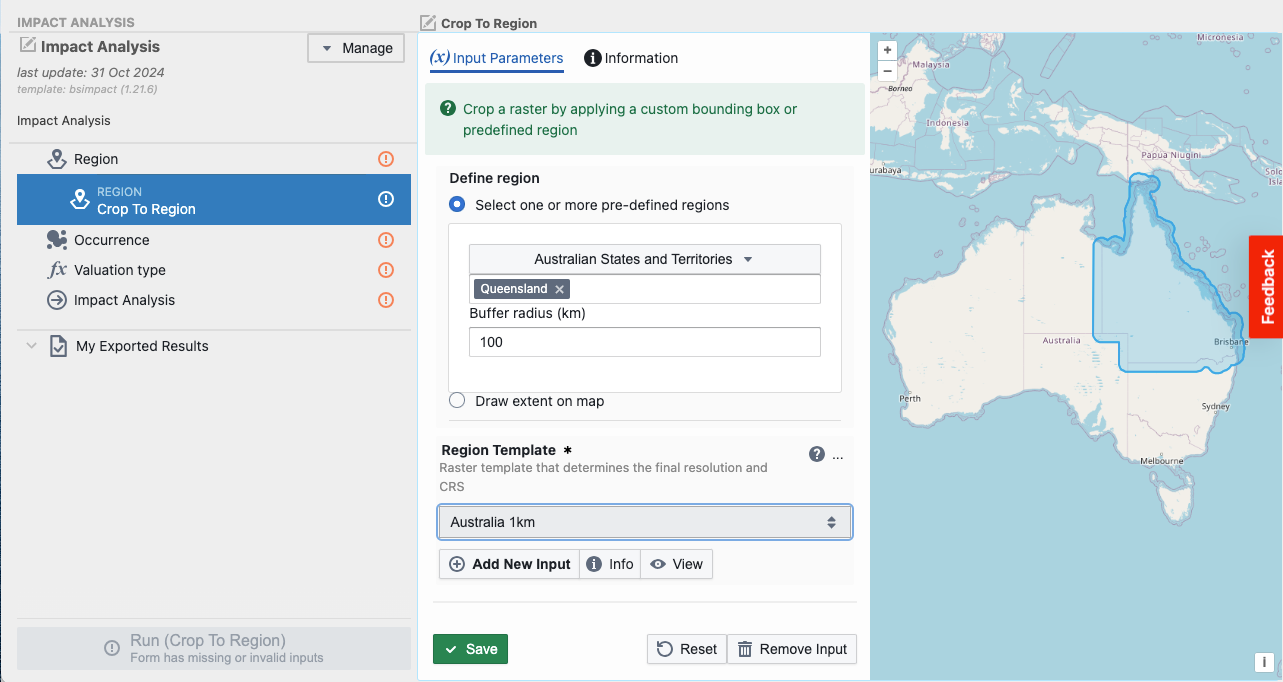
Or by selecting a rectangular area or drawing an enclosing polygon on a base map for your area of interest.
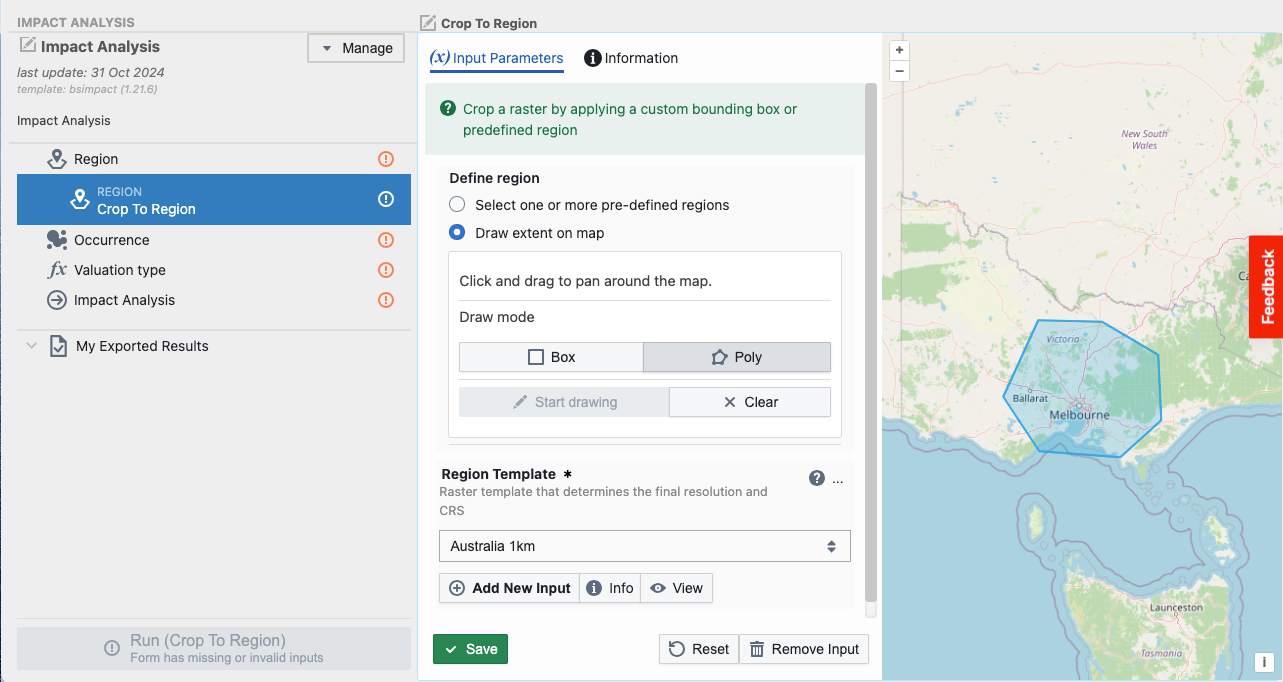
Both predefined and drawn regions utilise a base Region Template defining the resolution and extent of the custom region. An Australian Albers (EPSG:3577) CRS, 1km resolution raster is used by default, but can be replaced with any curated, uploaded, or workflow result raster.
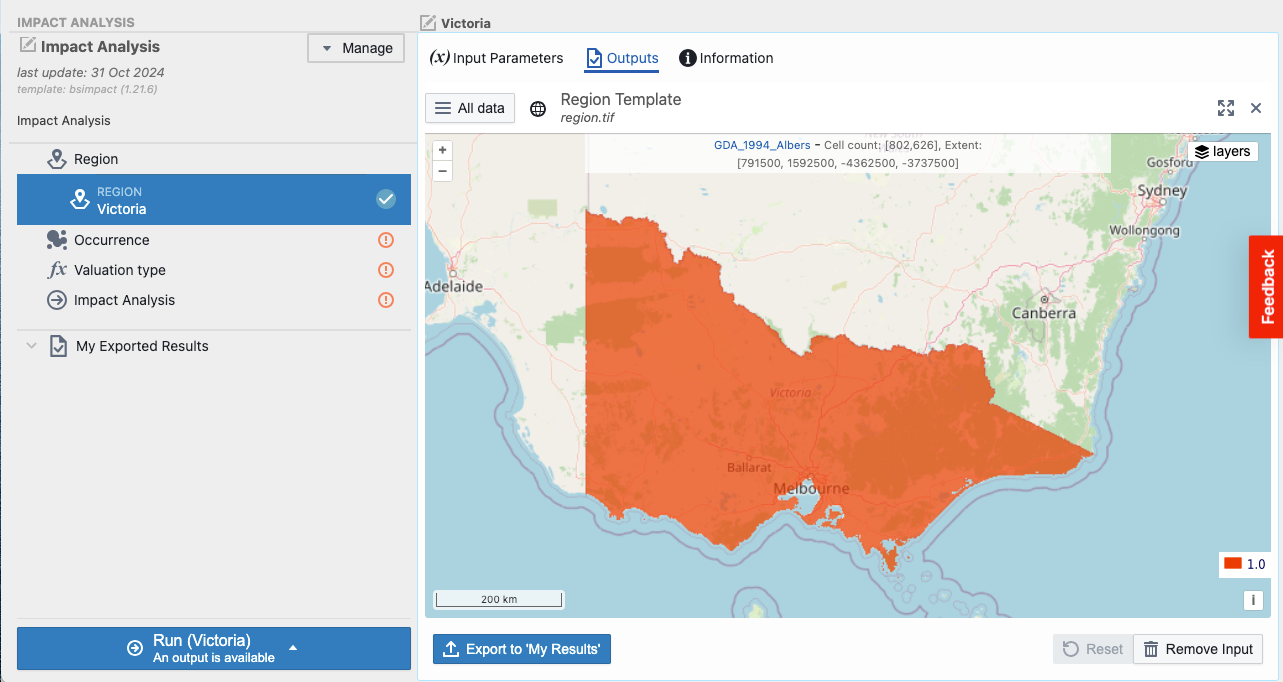
“Save” your region selections when finished, then run the region (cropping) via the blue “Run (Crop to Region)” button. Once finished, this will produce the cropped region template for the workflow.
2. Select a raster
Select a raster input from available (saved) results, previously uploaded datasets, curated datasets or upload a new raster file defining the study region extent, resolution, and coordinate reference system. Data that you upload to the platform will continue to be available throughout the current and new workflows.
Step 3. Specify occurrence
Specify the spatial distribution of either actual invasive species occurrences or their likelihoods via the following inputs:
- Occurrence raster(required): Defines the incursion presence, density, or probabilities at each spatial location
- Occurrence type (required): Indicate if the values in the raster represent incursion presence, density, or probabilities via selection
- presence
- density
- prob
- Multiplier(required): Numeric multiplier to transform/scale incursion values for calculating impacts (especially when type is “density”). Default is 1
- Threshold(required): Numeric threshold (>= value) for signifying sufficient incursion density or probability to contribute to impact calculations (after the application of the “multiplier”). Default is 0.
“Save” your selections when finished.
Step 4. Specify valuation type
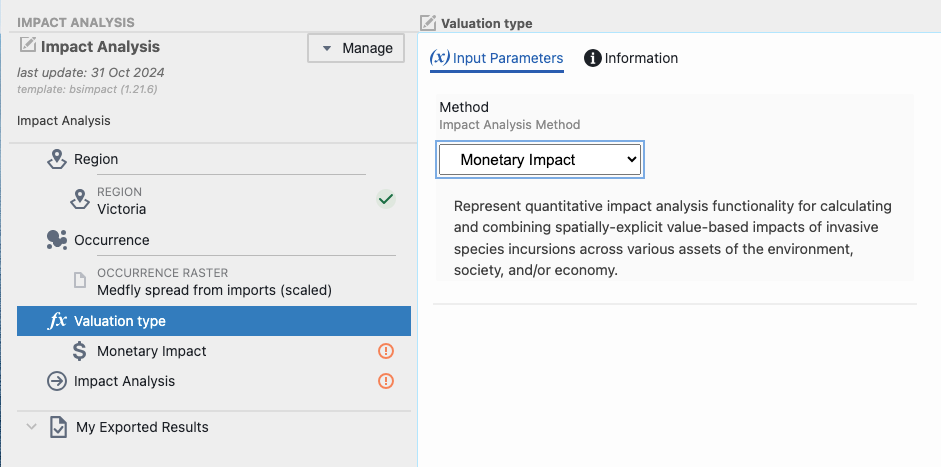
Select your impact valuation type. Currently the following valuation types are available:
- Monetary Impact
- Non Monetary Impact
These valuation types were described in the first section of this document.
These monetary and non-monetary valuation types are described in the first section of this document.
Additional impact valuation types, including rankings and categorical types, are anticipated in future versions of the Biosecurity Commons platform.
Depending on the impact valuation type the user selects, different options will become available.
1. Monetary Impact
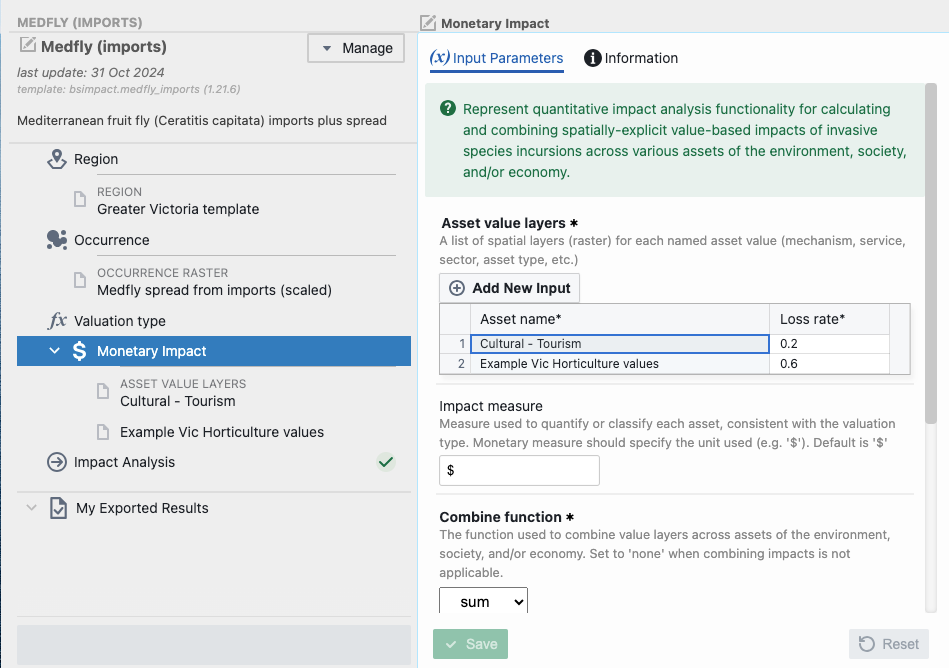
Selecting “Monetary Impact” will prompt users to specify the following:
- Asset value layers(required): A list of spatial layers (raster) for each named asset value (mechanism, service, sector, asset type, etc.). Once each layer has been added table entries are available for further entry
- Asset name(required): Descriptive name
- Loss rate(required): Proportion (0-1) loss in asset value at incursion locations
- Impact measure(optional): Measure used to quantify or classify each asset, consistent with the valuation type. Monetary measure should specify the unit used (e.g. $). Default is $
- Combine function(required): The function used to combine value layers across assets of the environment, society, and/or economy. Set to “none” when combining impacts is not applicable. Select from
- sum
- none
- Management costs(optional): Spatial layer raster of management costs at each location
- Management cost unit(optional): The unit of measure for management costs. This will typically be the same unit as “Impact measures”. Select from
- $
- hours
- none
“Save” your selections when finished.
2. Non Monetary Impact
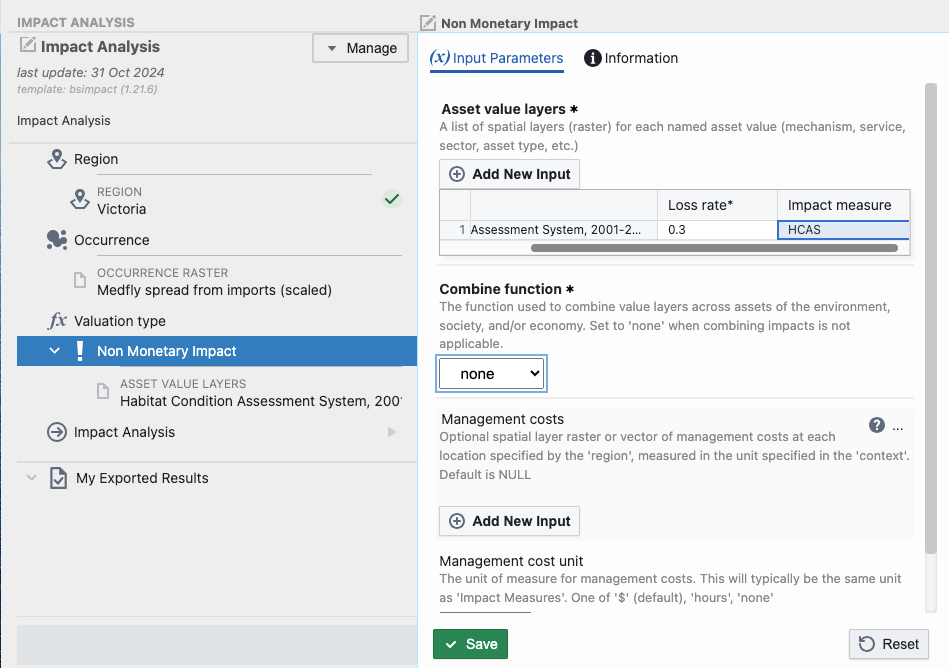
Selecting “Non Monetary Impact” will prompt users to specify the following:
- Asset value layers(required): A list of spatial layers (raster) for each named asset value (mechanism, service, sector, asset type, etc.). Once each layer has been added table entries are available for further entry
- Asset name(required): Descriptive name
- Loss rate(required): Proportion (0-1) loss in asset value at incursion locations
- Impact measure(optional): Measure used to quantify or classify each asset
- Combine function(required): The function used to combine value layers across assets of the environment, society, and/or economy. Set to “none” when combining impacts is not applicable. Select from
- sum
- mean
- median
- max
- none
- Management costs(optional): Spatial layer raster of management costs at each location
- Management cost unit(optional): The unit of measure for management costs. This will typically be the same unit as “Impact measures”. Select from
- $
- hours
- none
“Save” your selections when finished.
Step 5. Run your Impact Analysis
Once the Region, Occurrence, and Valuation type branches have been successfully configured you will be able to run your Impact Analysis, which will calculate the spatial impacts or likely impacts for each of your asset layers, given loss rates, as well as combined impacts if a combine function is specified, plus management costs when specified. If the valuation type is monetary, then the total cost will also be calculated when management costs are specified.
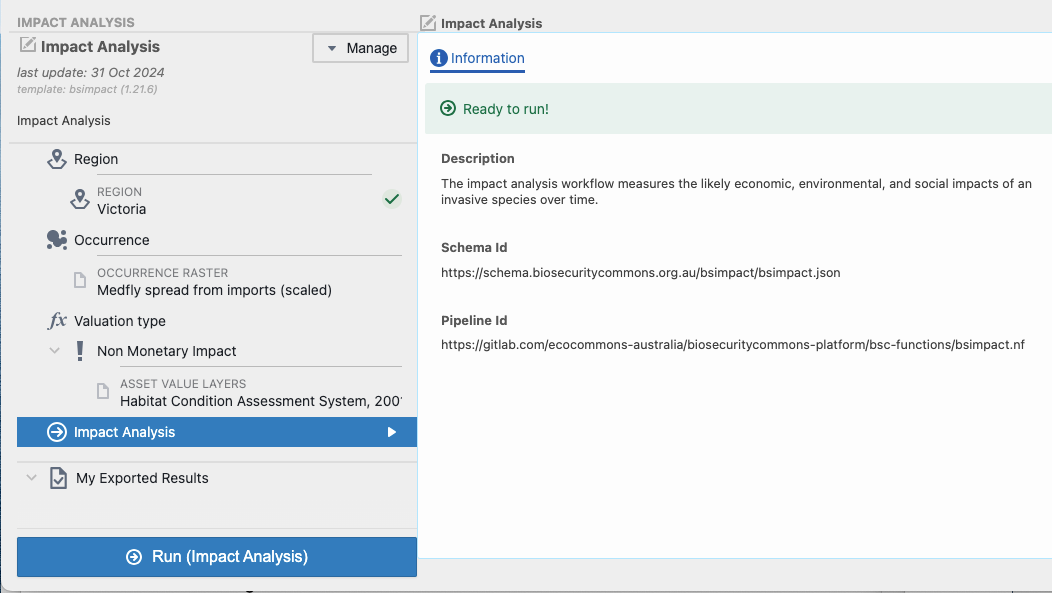
Click the blue ‘Run’ button in the bottom left to run your project. The output page will be updated as the job progresses from “Created”, “Submitted”, “Started” and “Success”.
Once it has finished, a green tick will appear next to Impact Analysis.
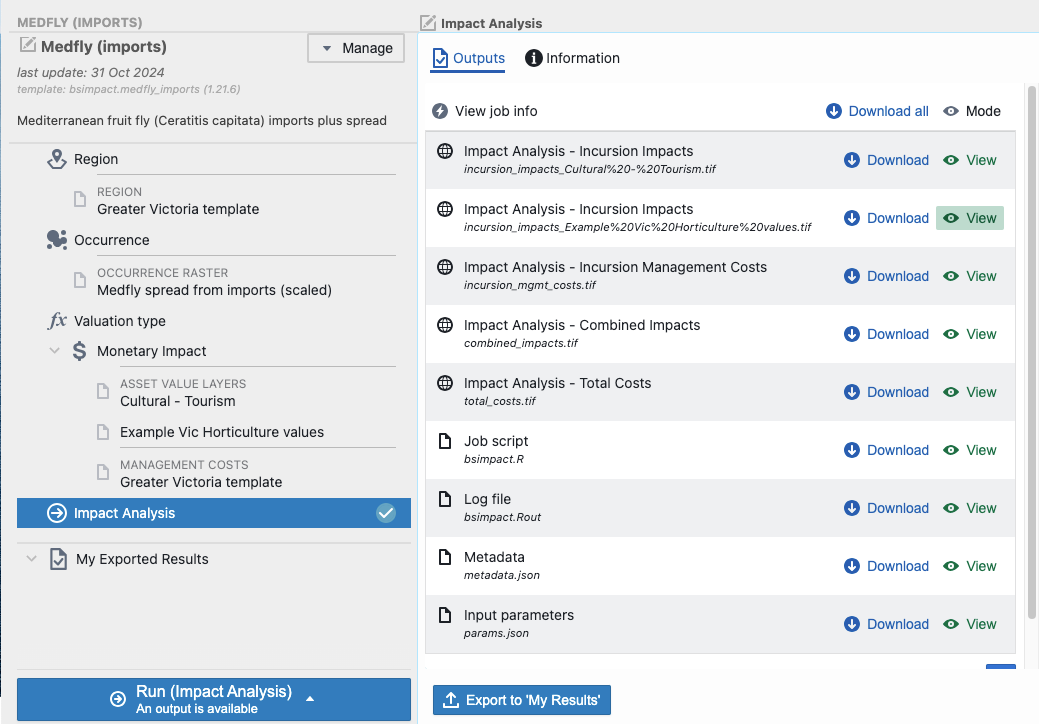
A list of model outputs will available be in the output pane, or when “All data” is selected. Each output can be viewed and downloaded. Calculated actual values are given when occurrences are specified as presence or densities, whereas calculated likely values are given when occurrences are specified as probabilities:
- Impact Analysis - Incursion Impacts: A geoTIFF for each impact layer with the calculated asset loss or likely loss at each incursion location
- Impact Analysis - Incursion Management Costs(if management costs are specified): A geoTIFF containing actual or likely management costs at each incursion location
- Impact Analysis - Combined Impacts (if a combine function is specified – other than “none”): A geoTIFF containing actual or likely combined asset losses at each incursion location
- Impact Analysis - Total Costs (if monetary valuation type and management costs are both specified): A geoTIFF containing actual or likely costs at each incursion location
- Job script: A copy of the R script used to build the risk map
- Log file: A text file containing processes, messages, and other details associated with model runs
- Metadata: A .json file containing the metadata required to run the model on Biosecurity Commons
- Input parameters (all models): Input parameters required to run the Job Script
Step 6. Exporting outputs for use in other workflows
Users may wish to save outputs for use in other projects or other workflows.
To do this, view the output of interest, and select “Save this Result” in the bottom left corner of the outputs section.
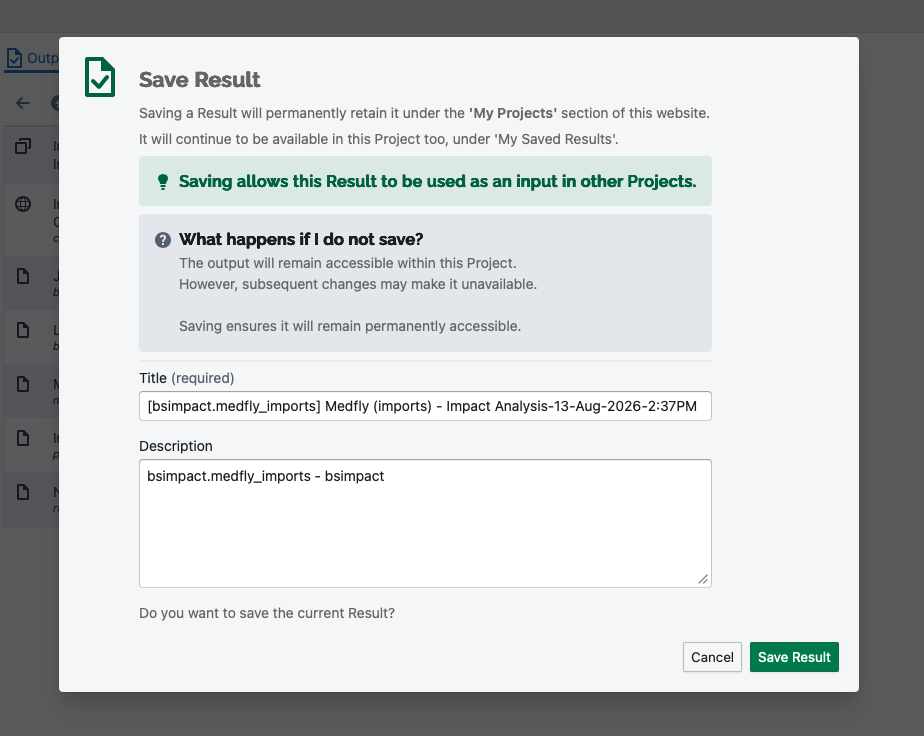
This output will now be discoverable in the user’s “My results” database, which in turn makes the layer available for use in other workflows.
Was this article helpful?
That’s Great!
Thank you for your feedback
Sorry! We couldn't be helpful
Thank you for your feedback
Feedback sent
We appreciate your effort and will try to fix the article