- Feasibility of Eradication
- Linkages to other workflows
- Completing a survey
- Step 1. Login
- Step 2. Dashboard
- Step 3. Survey response interface
- Step 4. Subsequent survey rounds (optional)
- Creating a survey
- Step 1. Surveys dashboard
- Step 2. Create a new survey
- Step 3. Manage your survey
- Step 4. Survey invites
- Step 5. Managing survey rounds
- Step 6. Exporting responses
Feasibility of Eradication
The Feasibility of Eradication tool is a structured, qualitative web-based survey designed to support decision-makers during emergency responses following a pest or disease incursion. Its primary purpose is to inform judgements on whether eradication is likely to be feasible under current conditions.
Developed in response to guidance from both government and industry stakeholders, the tool places strong emphasis on the technical dimensions of eradication feasibility. However, it is important to recognise that frameworks such as Plant Health Australia’s PLANTPLAN require consideration of broader economic, social, and operational factors beyond purely technical aspects. As such, this tool is intended to complement—not replace—these wider decision-making frameworks.
The survey consists of 28 questions, organised into six thematic modules that collectively capture the key technical components influencing eradication feasibility.
This decision-support tool is most powerful when used as a multi-stakeholder engagement mechanism. Bringing together expertise from government agencies, industry groups, technical specialists, and operational responders ensures that diverse knowledge, assumptions, and risk tolerances are explicitly captured. Benefits of this collaborative approach include:
- Strengthening the evidence base underpinning responses
- Exposing areas of uncertainty or disagreement
- Promoting transparency and shared ownership of decisions
Importantly, the tool does not produce a definitive answer on whether eradication is feasible. Instead, it provides a structured and transparent framework to synthesise expert input, generate a clear visual summary of the available evidence, and support informed, consensus-based discussions.
In practice, its value lies in facilitating robust, defensible decision-making under uncertainty, ensuring that eradication feasibility assessments are not driven by a single perspective, but by a coordinated, cross-sector understanding of the threat and response options.
This guide provides clear, step-by-step instructions for both completing a survey you’ve been invited to participate in and creating and managing your own survey.
For more details about the background of this tool, please consult Palma et al. 2025.
Linkages to other workflows
Feasibility of Eradication is a standalone workflow that does not directly link to other workflows available on Biosecurity Commons.
However, inputs from either survey participants (i.e. participants’ responses) or survey creators (e.g. contextual information to be associated with a survey) can be indirectly informed by risk mapping, spread modelling, surveillance design and impact assessment.
Completing a survey
Step 1. Login
If you have been invited to complete a survey, you will have received an email from eradication@biosecuritycommons.org.au that contains a link (this expires in 14 days) to log in and complete the survey.
This link will allow users to complete the survey without needing to register for a Biosecurity Commons account. However, we strongly recommend registering—doing so means you can revisit your past survey responses at any time. A banner will be displayed recommending users to register an account.
If you already have a Biosecurity Commons account, you can also access your surveys by logging onto Biosecurity Commons and clicking on the Feasibility of Eradication workflow from the platform dashboard.
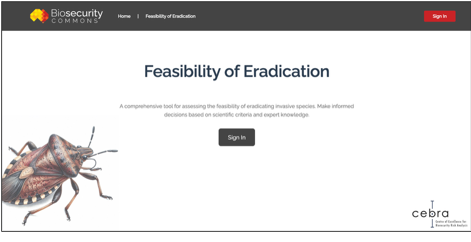
The workflow login page will look like the screenshot below.
Step 2. Dashboard
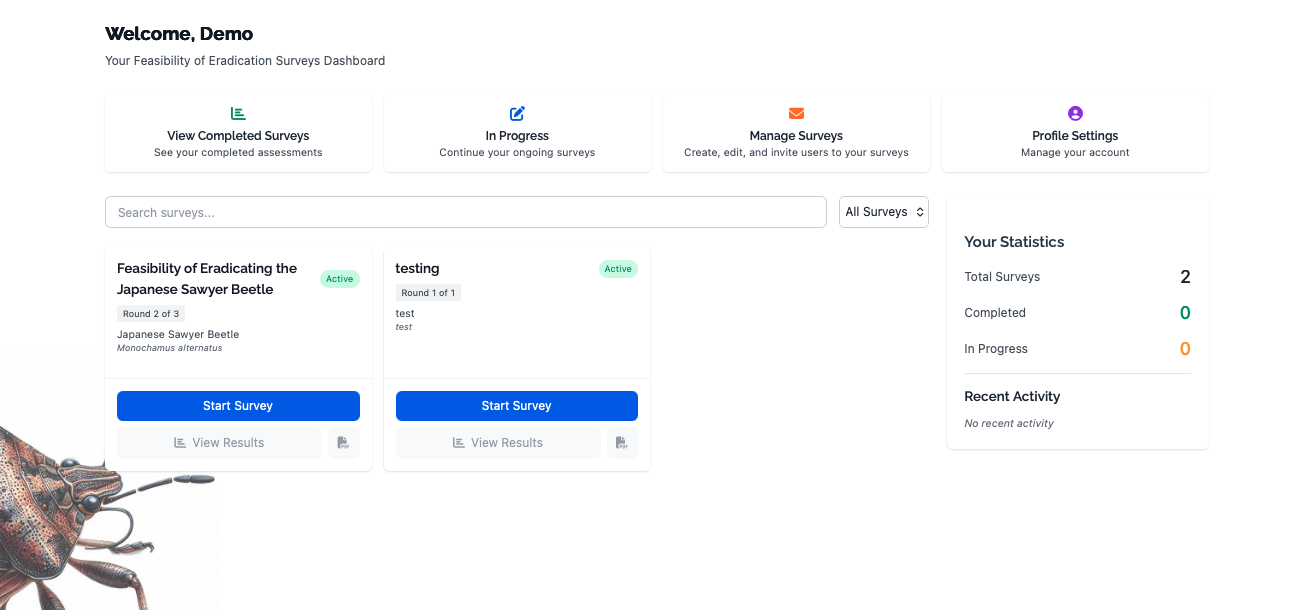
After logging in, users arrive at the dashboard which provides an overview of all available surveys, their status, and quick actions such as starting, continuing, or viewing results for each survey.
From this page, users can also view their statistics and recent activity, and view personal profile details.
The “View Completed Survey” tab allows users to view completed surveys and associated results. The “In Progress” tab allows users to see surveys they have commenced but are yet to complete. In circumstances where a user has many surveys, they may use the search bar and/or filter by status.
Step 3. Survey response interface
When a user opens a survey, they are presented with a tabbed interface that guides them through the assessment process. The main tabs are described below.
Instructions
The instructions tab provides an overview of the tool, step-by-step guidance on how to complete the survey, and explanations of the available response options.
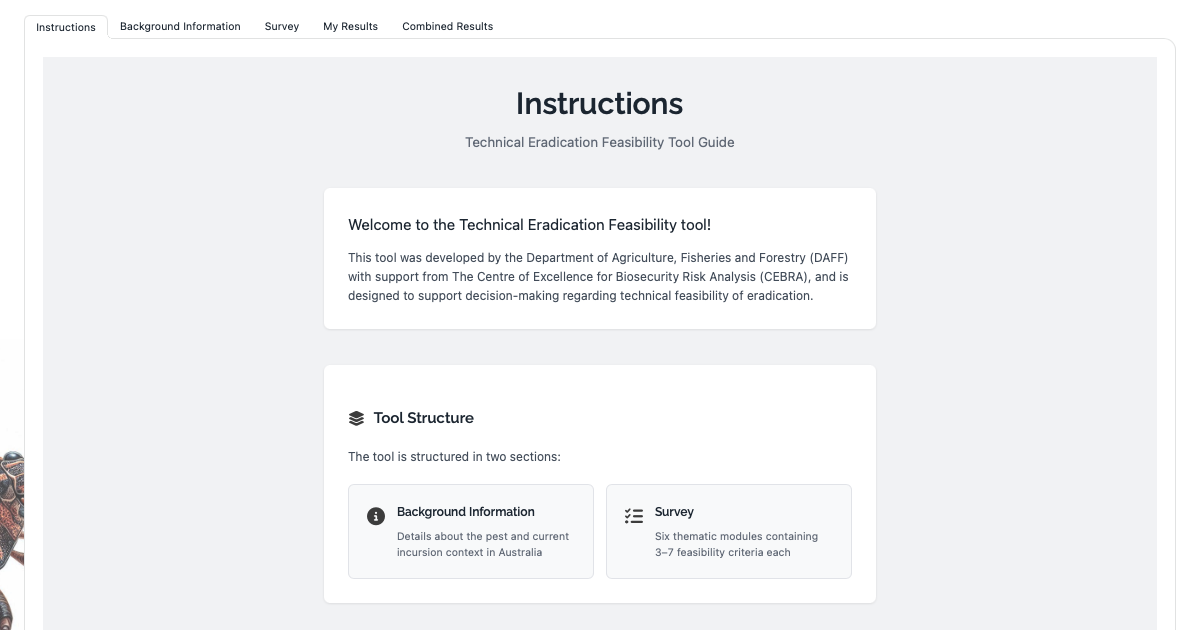
Scroll down to the bottom of the instructions and click on the ‘Continue to Background Information’ to move to the next part of the survey.
Note: You can navigate to each section of the survey by clicking on the tabs at the top of the survey.
Background information
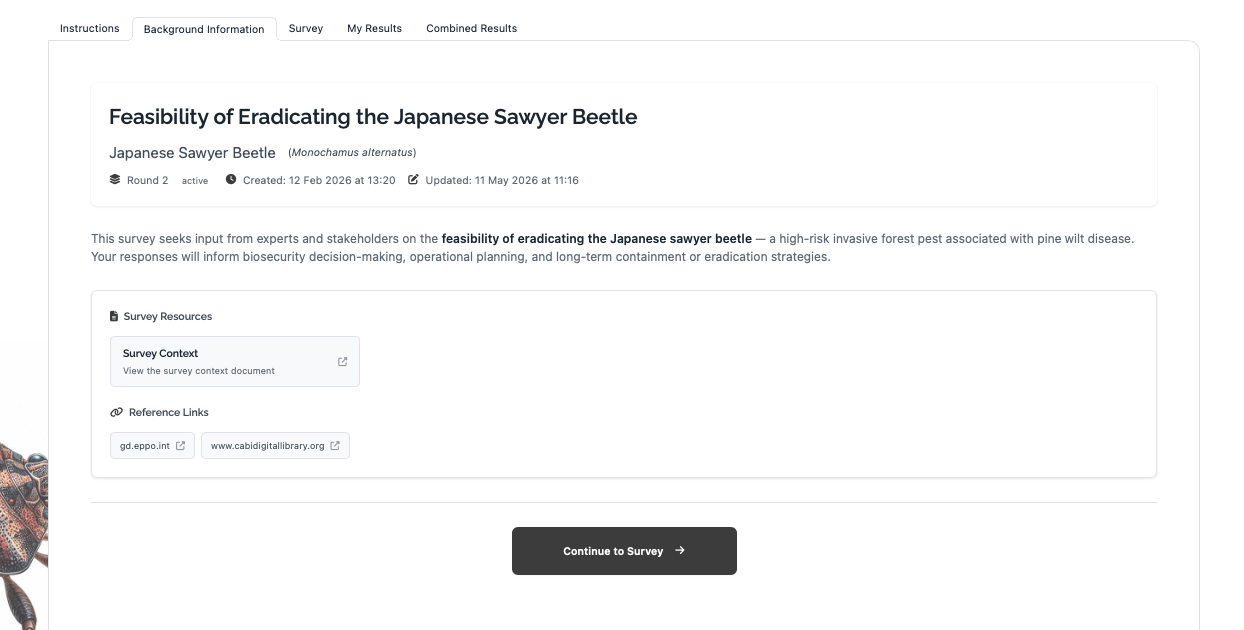
The Background Information tab displays contextual information about the subject of the survey. It includes relevant resources uploaded by the survey creator, scientific references, and links to supporting documents, providing information and context around the current incursion.
When you have read that, scroll to the end and click on ‘Continue to Survey’ to start the survey.
Start the survey
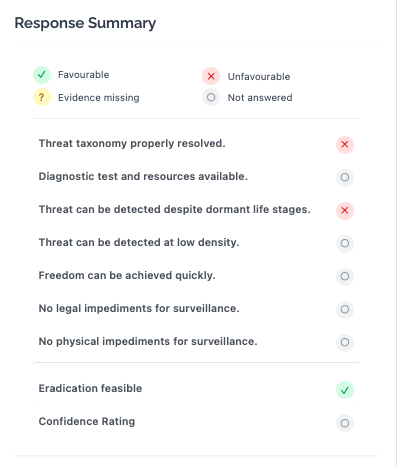
The survey tab is the main assessment form, where users answer structured questions representing feasibility criteria. Features include auto-save, progress tracking, and a real-time response summary sidebar that uses a traffic-light system to indicate the status of each response.
An initial question requests users’ primary affiliation, allowing later separation of results across the categories Government, Industry, Research, and Other, to identify commonalities and differences in perspectives. Subsequently, the survey presents 28 questions divided into six thematic modules:
- Module 1: Identification and detection of the threat (7 questions)
- Module 2: Biology of the threat (4 questions)
- Module 3: Current circumstances of infestation (4 questions)
- Module 4: Effectiveness of the control method (7 questions)
- Module 5: Acceptability of the control method (3 questions)
- Module 6: Ability to regulate threat entry pathway (3 questions)
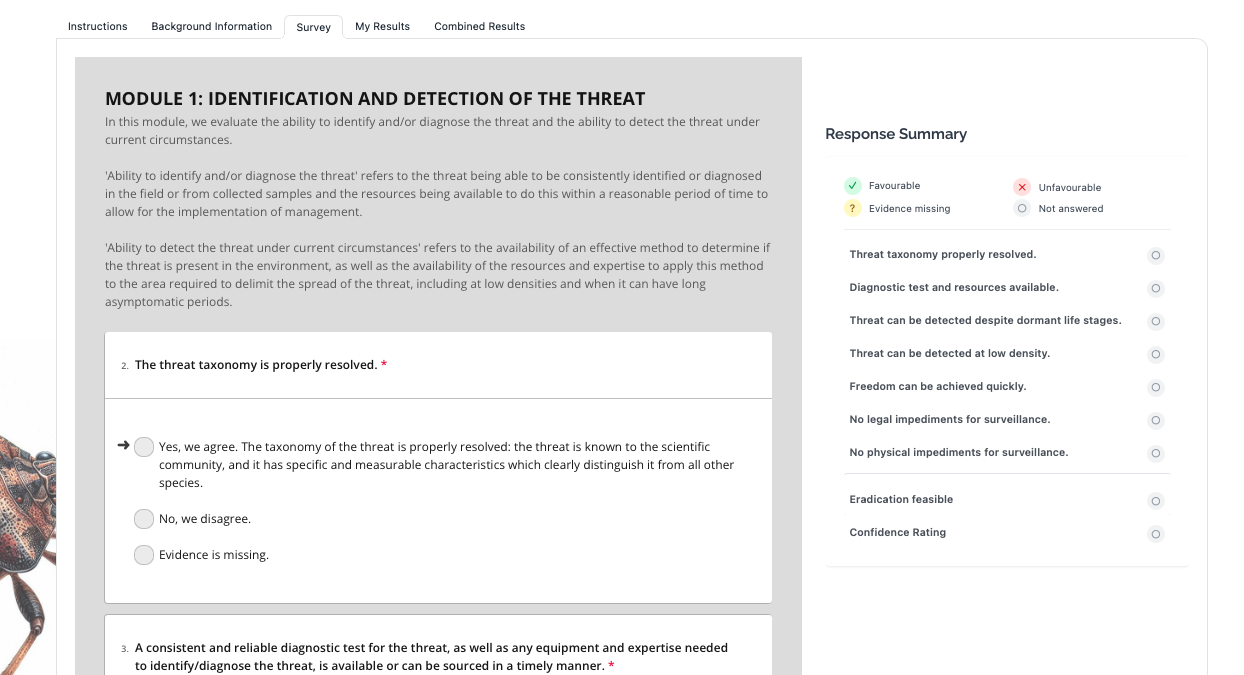
The questions, or evaluation criteria, within each module are presented as statements. Users are asked to either: (i) agree with the statement, (ii) disagree with the statement, or (iii) state that evidence to evaluate the statement is missing. To do that, users need to choose one of the following three options:
- Yes, we agree
- No, we disagree
- Evidence is missing
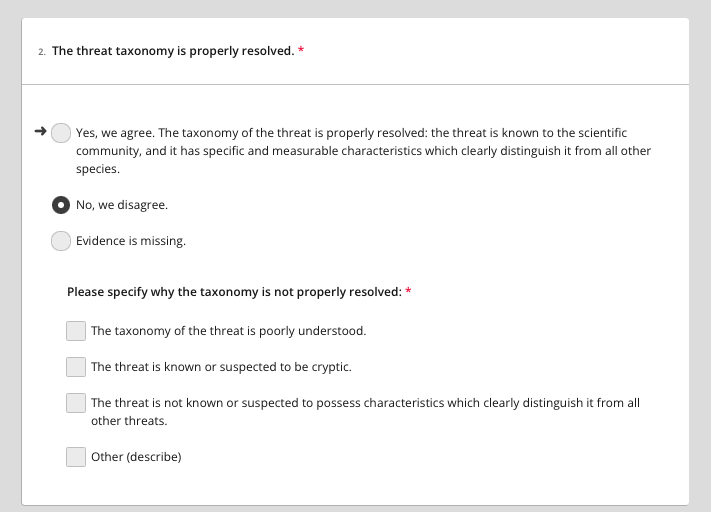
For some evaluation criteria, disagreeing with the statement prompts a series of predefined reasons for the user to choose from. Users may select one or multiple reasons, or alternatively, they may select the “Other” option to provide their own reasoning.
The survey requires users to answer all questions in each module. At the end of each module, the user will be required to provide a confidence statement on eradication feasibility with respect to the module’s theme.
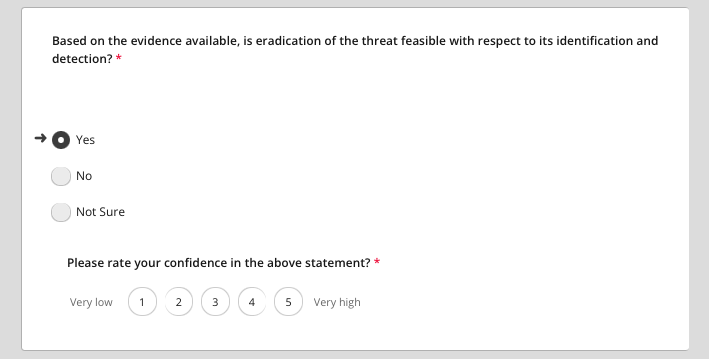
When users select “Yes” or “No,” they are prompted to rate their level of confidence on a numeric scale from 1 (very low confidence) to 5 (very high confidence). If “Not Sure” is selected, no confidence rating is requested, as this response inherently reflects uncertainty.
Once all questions in a module have been answered a user may progress to the next module by clicking the ‘Next’ button at the end of the module.
This process is repeated for all six modules, after which a user will be prompted to click “Complete”.
Response summary
As a user fills in a module, they can see a summary of their answers on the right-hand side of the survey. This is updated in real-time with a traffic light summary of the user’s responses to the evaluation criteria within that module.
Editing survey
It is important to note that a survey participant may edit their responses to a completed survey as frequently as they wish until the survey is formally closed by the survey creator/administrator.
To edit a completed survey simply click on the completed survey you wish to edit and click the “Modify Response” button.

Make the necessary changes and then click “Save Changes”. This will create a revised survey that will ultimately be summarised by the survey creator/administrator upon survey closure—older versions will not be used.

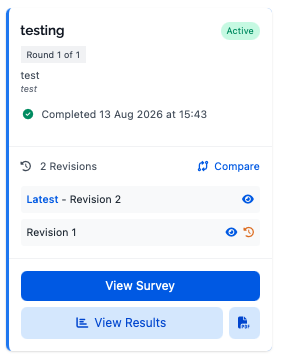
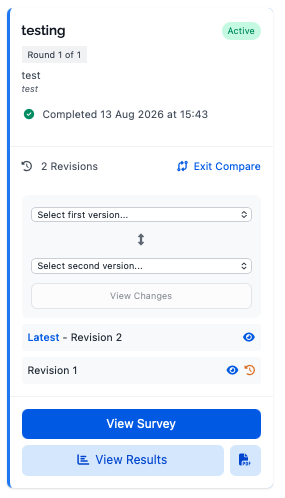
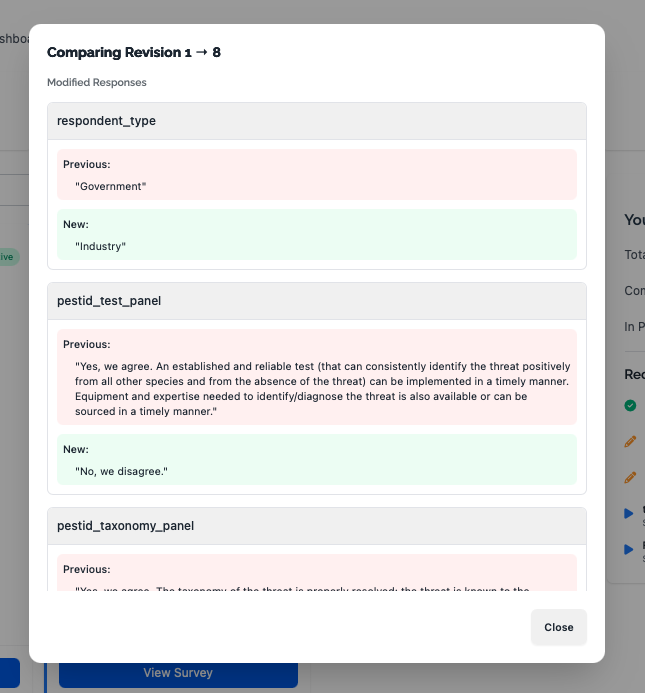
Users can, however, compare their revisions using the “Comparison” tool shown on the survey card, and if desired view and/or reinstate an earlier revision.
Public and private notes
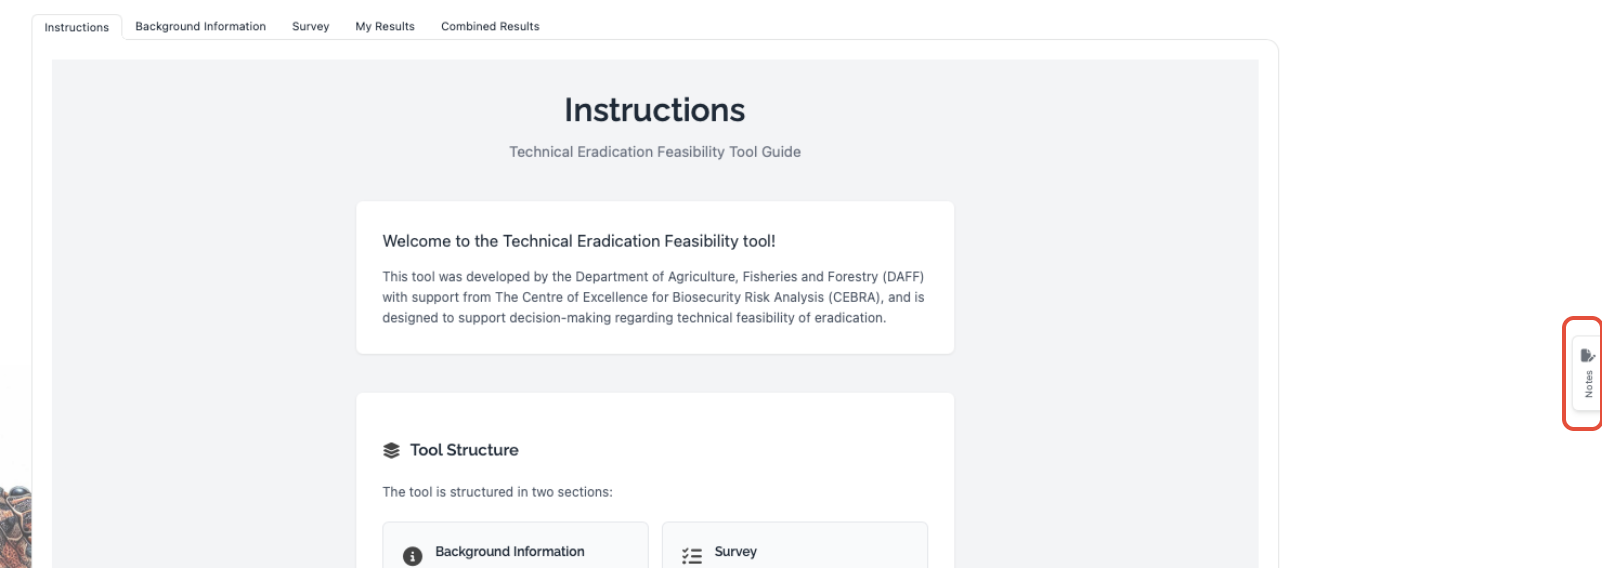
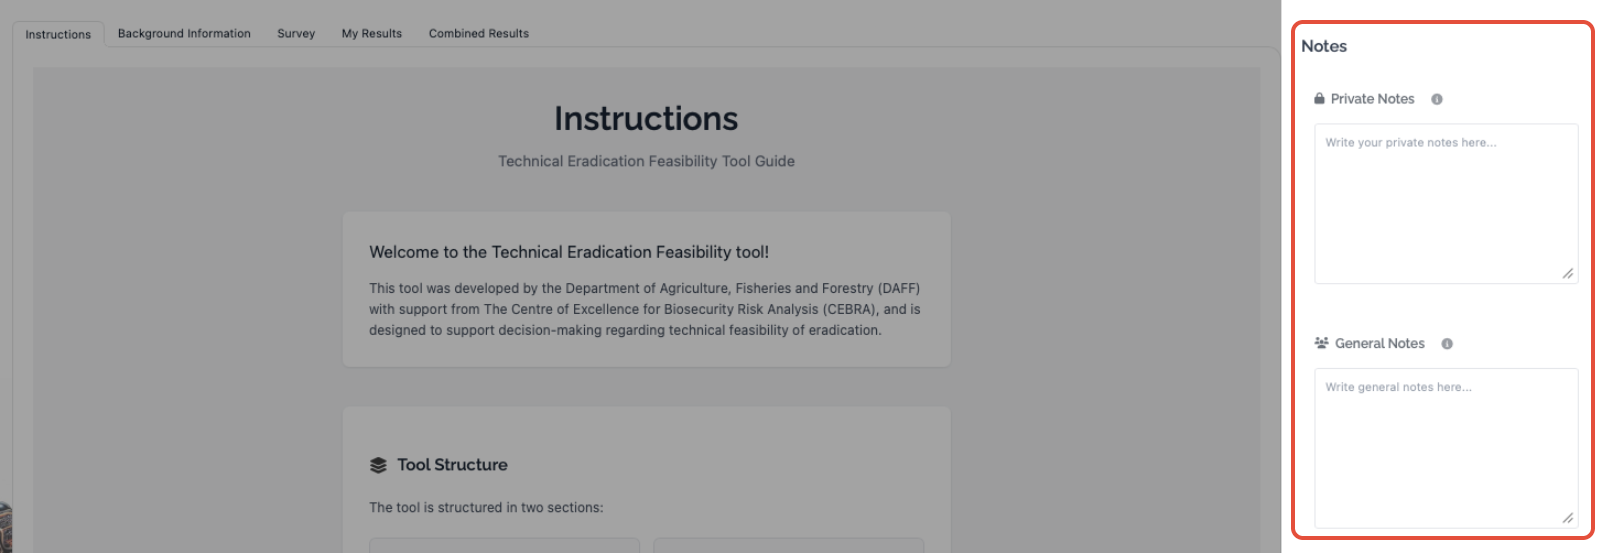
The survey also allows users to record notes, either for personal use (i.e. not shared), or to be aggregated and shared with other survey participants upon survey closure. The Notes drawer is accessible from the right side of the survey interface (screenshots below), which allows users to record both private notes and public notes.
My Results
The “My Results” tab provides a summary of the user’s submitted responses, including visual indicators, notes, and the option to download a PDF report of their assessment. For surveys with multiple rounds, the round can be selected from a dropdown menu found in the survey header.
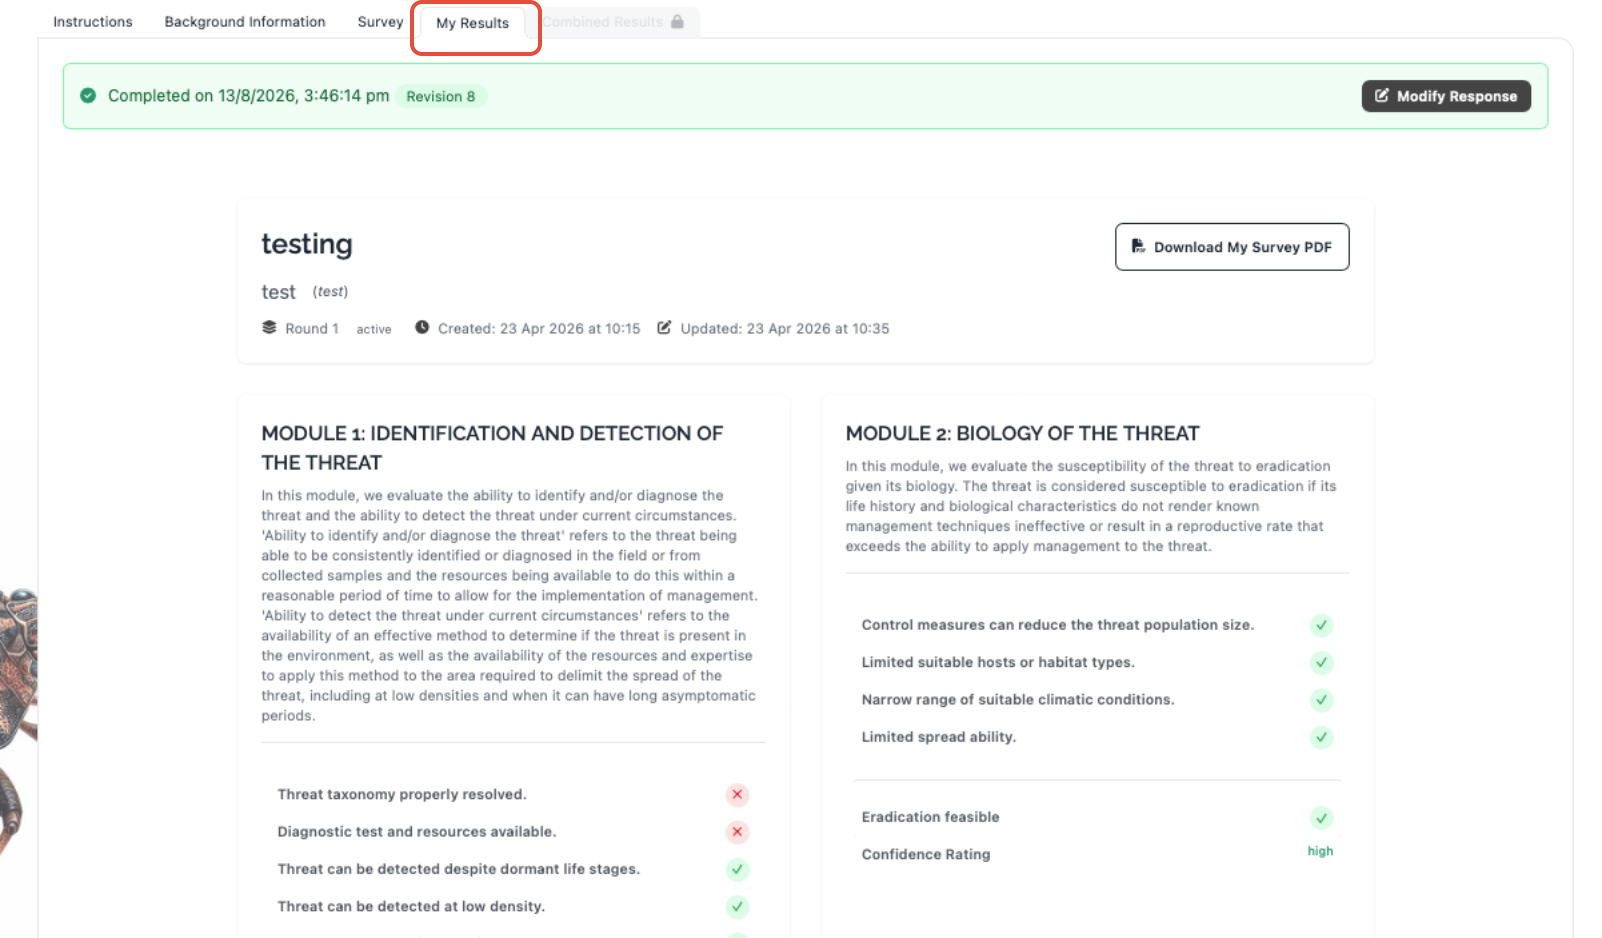
The Download My Survey PDF button allows users to export their individual summary for the selected survey round as a PDF report.
Combined Results
In the Combined Results tab the platform generates an aggregated summary of all respondents’ submissions for the survey, enabling users to compare their responses with the group and gain insights from the collective assessment. This is only available when the survey round has been closed by the survey creator/administrator.
The combined summary is structured into modules. For each module, the report presents two key outputs, for the selected survey round.
The first is a summary of the overall assessment of feasibility that users provided for the module, with their expressed level of confidence. This shows the number of users that responded ‘Yes’, ‘No’, and ‘Not Sure’ for each module’s final overall feasibility question, together with the respondents’ level of certainty.
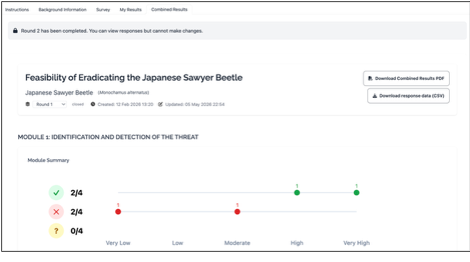
The second output is an overall traffic light breakdown of the answers provided by the users. This part highlights existing knowledge gaps and agreements/disagreements across users for individual criteria: knowledge gaps are presented by yellow and inconsistencies among users are reflected as multiple colours assigned to the same criterion.
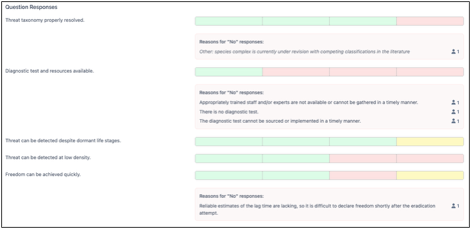
The Download Combined Results PDF button allows users to export the group summary as a PDF report. Beneath the Download Combined Results PDF button, survey owners will also see a Download Response Data (CSV) button, which will download a CSV file containing all respondents’ responses for all completed rounds.
Step 4. Subsequent survey rounds (optional)
Feasibility of eradication is often reassessed as new information becomes available. Where appropriate, the survey creator or administrator may initiate additional survey rounds to reflect updated knowledge. In these cases, participants are asked to complete the survey again, considering the new information.
When a new round is released the corresponding survey card on the user’s dashboard is updated to indicate that a new round is available and the user is prompted to start the survey.
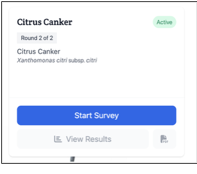
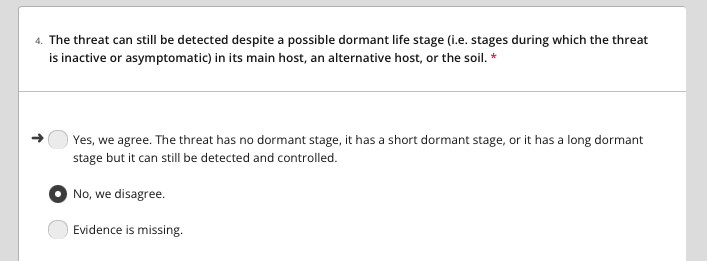
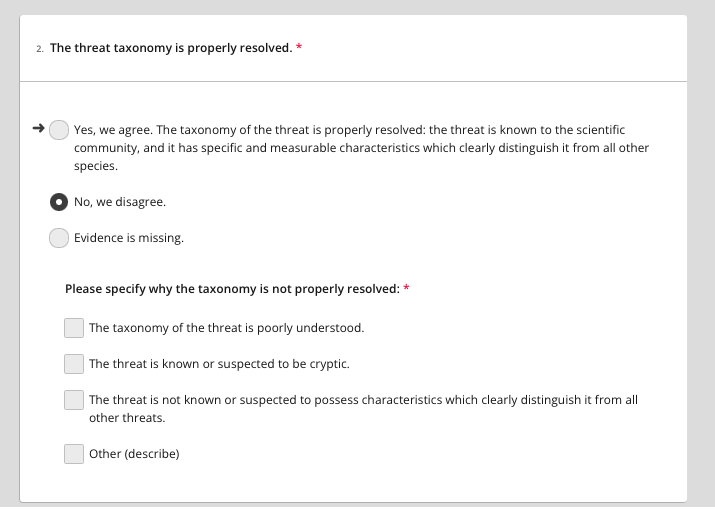
As users complete subsequent rounds, their previous answers are signified by the black arrow icon beside the answers. For example, in the screenshot below, the user’s Round 1 response is indicated by the black arrow next to “Yes, we agree.”, and we see that the user has modified their Round 2 response to “No, we disagree”. (Note that the plural pronoun “We” is used to reflect that a respondent will often be a representative of an organisation.)
Creating a survey
Step 1. Surveys dashboard
The platform includes an administration interface that enables users to create and edit their own surveys and invite users to complete those surveys.
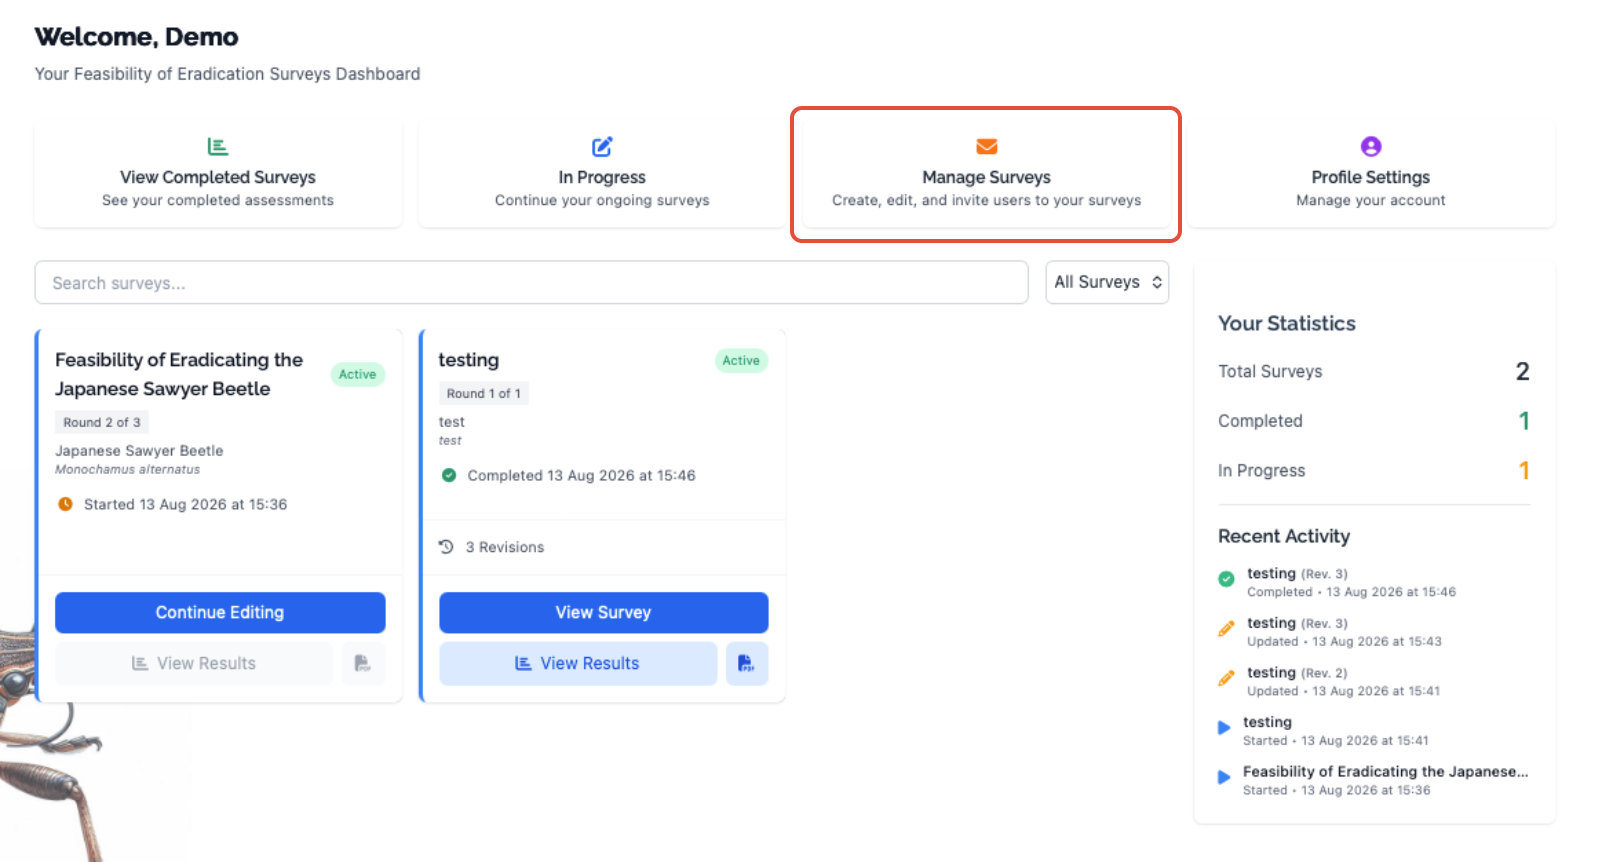
Click on Manage Surveys and you will be taken to the surveys dashboard pictured below.
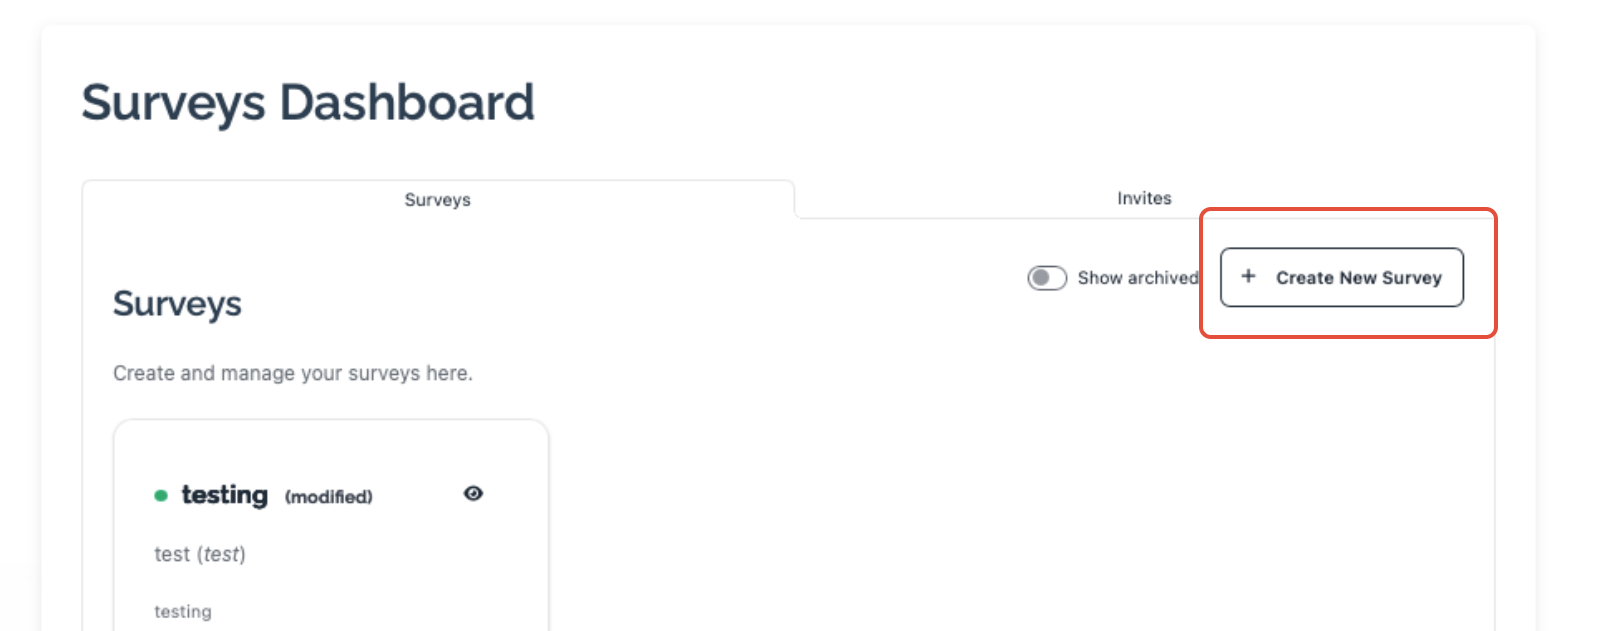
The dashboard is split into two tabs: Surveys and Invites.
From the Surveys tab you can create your own survey by clicking on the ‘Create New Survey’ button.
Step 2. Create a new survey
After clicking on the ‘Create New Survey’ button you will be presented with a form to complete (see screenshot below).
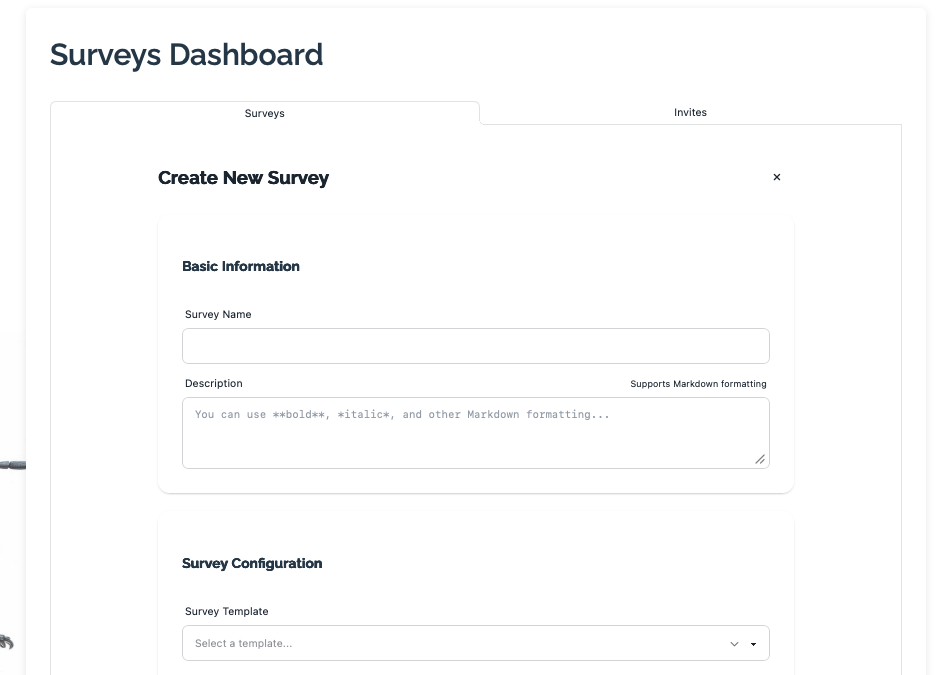
The form contains several sections to fill out, including:
- Basic information
- Survey Configuration
- Resources
- Survey Status
- Additional Content
- User Access
Basic Information
In this section you can enter the survey name and a description of the survey. Note that the Description text box supports Markdown formatting.
Survey Configuration
Users can select from pre-existing survey templates available on the platform.
If you would like to request the development of a new survey template, please contact us on support@biosecuritycommons.org.au.
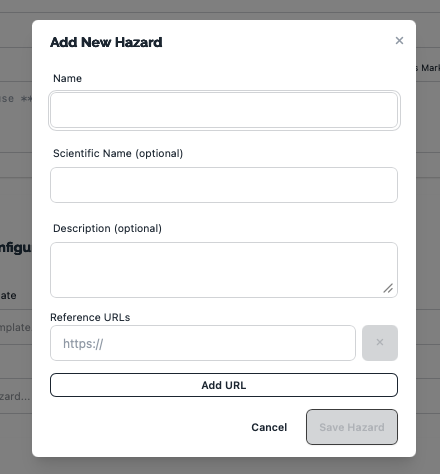
Survey configuration also involves defining the focal hazard or threat, which can be selected from a list of those you have previously defined, or created by clicking on ‘Add New Hazard’ in the drop-down menu. You can then add the details for that hazard in the form that appears (see screenshot below).
Resources
Here you can include links to web resources that will be useful to participants of the survey. For each resource you can add a title, URL and description, clicking ‘Add Resource’ when complete.
Survey Status
This section allows you to change the status of the survey between Draft, Active, Closed and Archived. By Default, the survey will have Draft status. Individuals cannot be invited to the survey until it is Active.
As a Survey Creator/Administrator, you can optionally set a survey closing date and time, as well as the number of survey rounds. However, we recommend that administrators manually close surveys and open additional rounds as needed, thus providing some flexibility for late responses (though rounds may be reopened if needed).
Note: Administrators can retrospectively add new rounds or modify the closing date if required.
Additional Content
Here, you can upload additional content such as incursion reports or other relevant material. Accepted formats include: .pdf, .doc and .docx. Individual files must not exceed 50MB.
User Access
This section allows you to select the users that you have previously invited to access your survey. Note that as a survey owner, you will not appear in this list but are granted access by default. We have more detail on how to invite users in the next section.
When you are ready, click on the ‘Save Survey’ button at the end of the survey.
Step 3. Manage your survey
When your survey is created (and Active) it will appear in the survey dashboard under the surveys tab (see the example below). Invited users will also receive a notification in their dashboard, alerting them to the availability of a new survey.
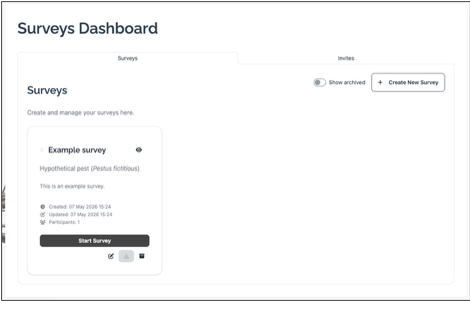
From here you can preview the survey, edit it and start it by clicking on the ‘Start Survey’ button.
To participate in your own survey, navigate back to the workflow dashboard and you will notice the survey now appears in your list of surveys.
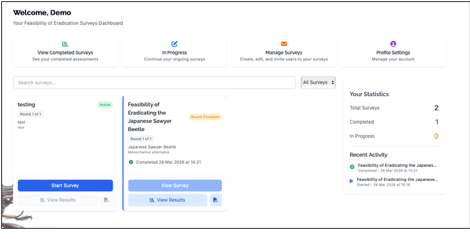
Click on ‘Start Survey’ and you will be taken to the survey response interface.
Step 4. Survey invites
You can invite users to the platform. When users have been invited to the platform, you can then give them access to take part in your surveys.
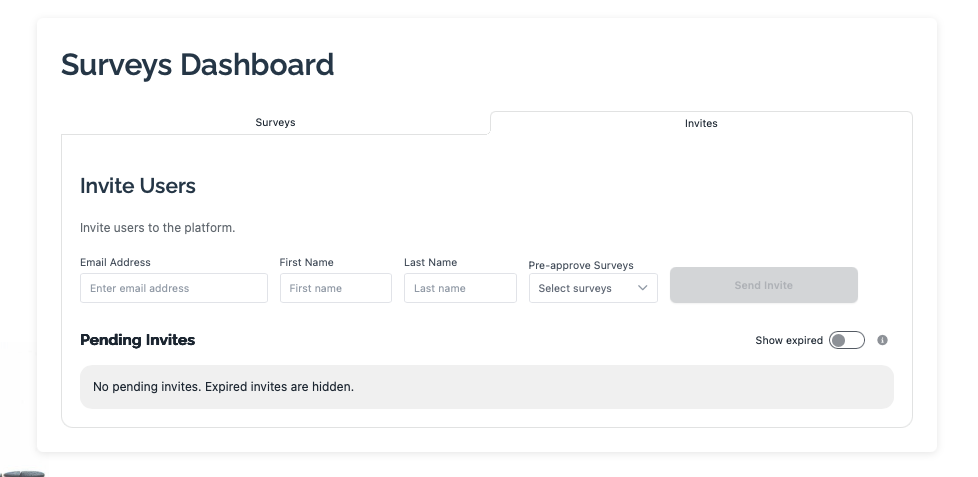
Enter the user’s details and click the ‘Send Invite’ button to invite them. Where appropriate, assign the user to “Pre-approved” active surveys. Doing so will mean they have immediate access to the survey.
Invited individuals will receive an email from eradication@biosecuritycommons.org.au, containing a link to log in and complete the survey.
The ‘Pending Invites’ section shows users that have been invited but who have not yet accepted the invite.
Step 5. Managing survey rounds
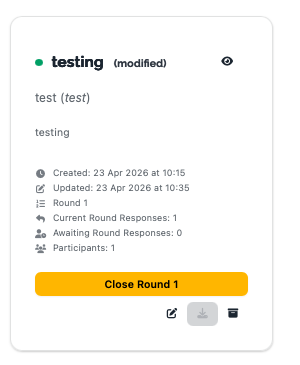
On the Manage Survey tab, survey creators/administrators can see for each survey, the number of participants, the number of responses submitted for the present round, and the number of participants that are yet to respond. Hovering the mouse cursor over these items reveals a list of participant names and indicates whether or not each has submitted a response.
At any time, the survey owner may close the survey by clicking the yellow Close Round button, which will prevent any further survey submissions/modifications for that round, and automatically compile all participant responses into a single aggregated results report. This report can be downloaded as a PDF or viewed directly on the platform. The aggregated “combined” report is only accessible to platform administrators, the survey owner, and the invited participants, including those who did not submit responses. The survey owner can access the survey results via the “Survey Dashboard” in either on-platform view or PDF report format.
Note: Closing a round prevents any further submissions. It is therefore recommended that participants are notified in advance of the closure to ensure they have sufficient time to complete the survey.
In some circumstances a survey owner may wish to reopen a round (e.g., due to a late response). To do this, simply click the “Manage Survey” tab, and then select the blue “Reopen Round” button. This will reopen the existing round such that additional participants may submit their answers. Upon closure, these additional results will be aggregated with all other results associated with that round.
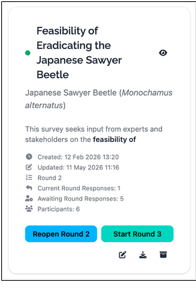
Alternatively, when new information becomes available, a survey administrator may initiate an additional survey round. It is recommended that the survey owner first update the background information by selecting the Edit button and appending the new details to the survey. Once this is complete, the survey owner can select Start Round X, allowing previously invited participants to review the updated information and submit revised responses.
Note: Survey owners can invite additional participants at any stage, regardless of whether they were involved in earlier survey rounds.
Step 6. Exporting responses
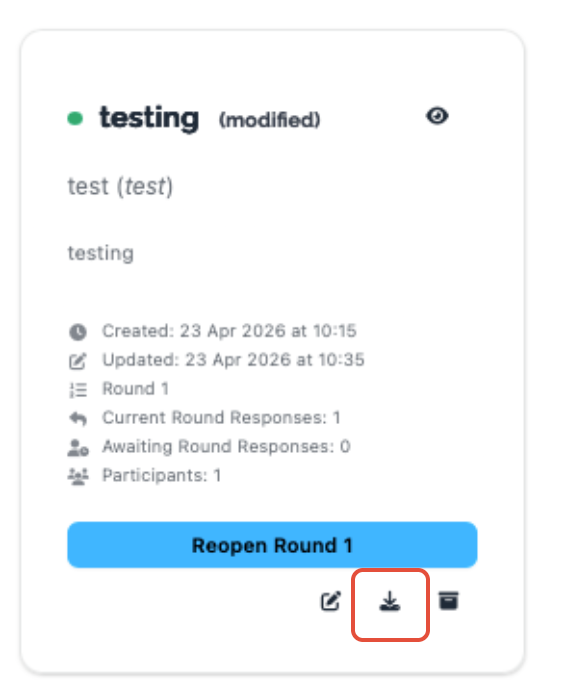
When at least one survey round has been closed, survey owners can download respondents’ response data as a single CSV file. This can be done either from the Combined Results tab of the survey itself (see Step 3, above), or by clicking the download icon button on the survey card within the survey management interface. The CSV file contains responses for all completed rounds.
Was this article helpful?
That’s Great!
Thank you for your feedback
Sorry! We couldn't be helpful
Thank you for your feedback
Feedback sent
We appreciate your effort and will try to fix the article